Tuesday, April 26, 2011

FOTD- Bright Pink Lips!

Decided to jump into the bright pink bandwagon and do a FOTD with a pink/fuscia lippy.  This is much easier said than done, however, as I have heavily pigmented lips so the lippy needs to have at least a medium coverage and a decent consistency for comfort.


Eyes:
  • UDPP and Inglot eyeshadows (grayish beige and shimmery nude)
  • Upper: Thick eyeliner (inspired by Kate Moss) K Pallette 24 Hr eyeliner
  • Lined lower lashline with Inglot's Eyeliner Gel in Matte
  • Mascara and lashes

Cheeks:
  • MAC "gentle" mineralized blush.
  • Highlighter and bronzer.

Face: Clinique's Workout Makeup (lasts a Loooong time!) applied sheer, and powder to set.

Lips: MAC Speak Louder lipstick, a bit of clear gloss in the middle of pout.


Minus the lashes and with an actual outfit on! :)

Wednesday, April 13, 2011

On Beauty

Every girl wants to be pretty, right?  Although the name of the blog is Simply Superficial, I, too, come from the school of thought that true beauty comes from within. We have to have love in our lives for it to show through in the radiance of our smiles.  We have to eat and drink healthy for our skin to behave itself and our bodies to cooperate with the latest trends in fashion.  We, as women, have a lot to work on.  Simply Superficial is a handy dandy guide for living your life with flair.  There won't be any making fun of others in order to make ourselves feel better around here.  At least not to your face.  I kid.

Simply Superficial was created as the bastard child of a sick and twisted love affair of skincare and makeup.  Or a threesome because I'll throw a little bit of health and exercise in along with it.  Although I am not a Makeup Artist by day, I do have Makeup Artistry Certification from MUD in Burbank.  I haven't been lucky enough to make enough money doing that which I love to keep me in the house and city I choose to live in.  I'm also a licensed esthetician, which means I studied the skin and can perform facials for a living- if I so choose.  What can I say, I have an extreme fascination for the beauty industry.

Although I do have some sort of qualifications, please take my reviews and what I say with a grain of salt.  If you haven't already noticed, I like to joke around, also I haven't practiced makeup for a while (other than on my own darn self) and have yet to make a living off it.  So the reviews are from me, my own standpoint, opinions, and may or may not work for you.  I would always recommend going to places that have great return policies just for this reason alone.

I am a newlywed with a lovely new home, a fantastic amazing hubby, and two of the cutest dogs in the world.  Waiiiiit a sec, I am sensing a bit of doubt here.  I know, I know, every damn dog owner claims that their dog is the cutest one of 'em all... so I shall furnish proof.


We are enjoying the beginnings of our mini family and having a grand old time while we're at it!

Makeup should be the paint in which we ladies color the world... so have fun with it!

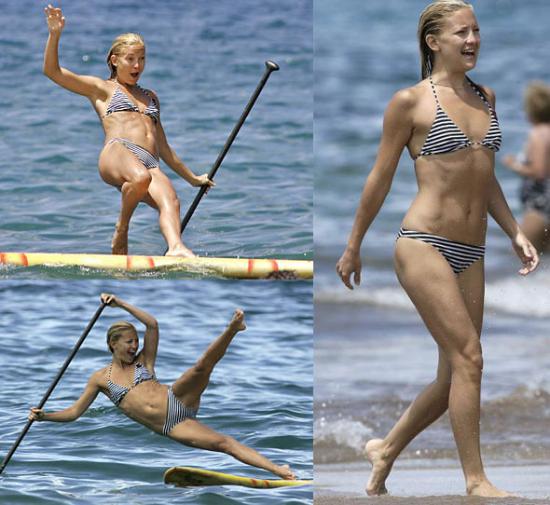
Thinspiration...

After my workout and lunch today, I decided to take the dogs outside and lounge in the yard.  So, I lubed up with sunscreen and proceeded to get a tan.  One caveat, the weather was TOO NICE!  A perfect balmy 76 degrees with a gentle breeze cooling me down nicely.  It didn’t really get hot enough to get a nice tan so I just enjoyed the perfection that is our Californian weather.  Wherever I go out in the world (minus Hawaii, oh… and bahamas) I always miss home.  :) 

On another note, I don’t seem to be losing any weight!  I notice that there is more tone and definition in my abs and arms, and my face looks a bit slimmer overall, but the number on the damn scale isn’t changing much.  It gives me great displeasure to come to the conclusion, then, that I should probably be changing my diet.  Overindulging in carbs isn’t healthy and I know it.  I need to come off the idea that I need to eat such uniquely large portions in order to feel satisfied.  (I can eat a variation of noodles for every day of the week!)  So, I’m going to start watching what I eat and to try my best to monitor and keep to some sort of healthy eating schedule.

I’ve been pushing myself to be more healthy for so long now… I want to see more of a difference, I deserve to see more!  It would be wonderful to finally hit that magic number of 110.  Aaahhhh… so neat and compact looking eh??


Check out her abs!  Her toned legs!  I’m sure she works out all the time and spends her meals munching on leaves and grains but …  *sigh* might it be worth it?  In the words of kate moss,

“Nothing tastes as good as skinny feels.”
 
Oh really?

Pit Fat Pitfalls..

Yeah… you read right… as in ARMpit fat.

While working out can drastically reduce one’s overall health and reduce body fat and weight, we are now learning that sometimes… that is not enough.  Yes, when your body fat decreases, you appear leaner and that enables your toned muscles to shadow its way through.  Some fatty places, are here to stay.

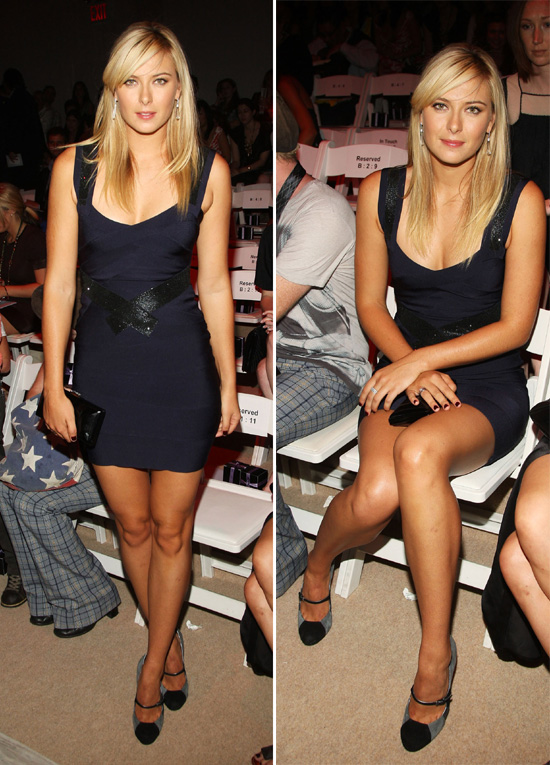
Now Maria Sharipova is a superstar athlete and the Beautiful Face representing a multitude of big names… but she still has a teensy weensy bit of protruding pit fat.  It is attempted to be hidden in this pic- unsuccessfully, to a pit fat spotter like me.   It’s sad that super stars/celebrities even fall prone to this type of thing!  Some people call it “escaped boobage” some people call it fat.  There are exercises I found online to fight this type of fat and to activate the muscles in the area to tone up, including inclined bench press, butterfly press, etc… but these pockets of fat are really REALLY hard to make disappear.


Ultra glamorous hollywood vixen Katherine Heigl cannot escape the wrath of the pit fat attacks!  *sigh*  Do we average girls even stand a chance??  Are we left to master the arts of photoshop in order lessen the damage in pictures and use pashminas and scarves in new creative manners to cover up??  Even little girls are susceptible!


What if it is escaped boobage?

Well, in order to stay informed, I did a bit of research on that too.  There is a theory out there, I’ll give it the name:  “wrong bra theory” the theory states that: most women are wearing wrong fitting bras.  These bra cups are too small and the bands are too loose.  (Even when fit by a professional… btw… those old ladies at the bra counter at Macy’s are NOT professionals- they just stayed there too long)  

The cup should be wide enough to go around your entire boob.  You should bend over, scoop your underarm fat “escaped boobage” up and over into the cup, and there should be no spillage or “double booby syndrome” where it looks like you have a total of four boobs.  There should be no spillage.  The band should be tight enough to support your bubbies on its own (without the strap) and the straps should just be leverage- angling them up towards the right direction. Supposedly, finding the right bra and continued wearing of the bra will eliminate the pit fat in as little as a month or two and INCREASE your bra size by one cup!  Hip Hip Hooray!

So Obviously, I’ve been inspired to navigate my pit fat back into my boobs!  The aforementioned website also claims that if left unaided, the problem can migrate to your back.
The pit fat can move towards your back creating really unattractive nasty rolls in your back!

Photo Courtesy of walmart

 
Do you really want to do that to yourself?  Get to measuring… get to a quality bra shop and make sure the underwire cups go around your breast nearly to your underarm… and TUCK IT IN!

Fishtail Braids

Photo Courtesy of style.com

Fishtail braids are SO IN right now… and, amazingly easy to do!  The best part about the fishtail braid is that you can very easily practice on yourself to get things “perfected” before moving on to doing your whole head in sort of a french fishtail braid.
Start: by separating your hair into two sections.
Take a bit from the left side add to the right side.
Take a bit from the right side and add it to the left side.
Repeat.

*Note: you always have a total of two sections.  You are simply taking pieces of one and borrowing it to the other side.  And vice versa… One section in each hand is easiest for me.

Couldn’t be more easy huh?  It’s funny, the messier the braid- the sexier your fishtail will look!  So practice (or not!) your way into the perfect messy undone, oops-I-didn’t-try-so-hard fishtail braid.  I don’t know why exactly this braid technique is coined “fishtail” it looks more like a fish “bone” to me.
Photo Courtesy of dimannodesigns

Photo Courtesy of catwalk.designer

Photo Courtesy of thefrisky

Perfect for the mild spring weather!  A unique braid which oozes sexy and  disheveled messiness.  Wrap the ends with a clear non-snagging rubber band and wrap and secure with a pretty ribbon or a piece of your own hair for the perfect polish.  Trust me on this ladies, this is the regular braid’s older, sexier cousin, fresh off the catwalks of Paris heading straight for the nearest beach!  Slide into your bikinis ladies and grab your leather sandals, pucker on a some fresh lip gloss and you’ll be set!

On Perfumes..

Because one of the duly noted privileges of being a girl (woman) is the ability and luxury to smell sweet, pretty, and… well… nice.  We get to explore the magical, special, nostalgic, curious world of perfumes.  Consider this an informative post, because we’ve all got questions and hopefully I can round up some answers.

CHOOSING YOUR PERFUME
Photo Courtesy of Sephora


Choosing perfume is akin to choosing your style of clothing.  If you love florals, look for scents with flowers heading the mix.  If you like fruity, lean towards the lighter, splashy scents with notes of your favorite fruits such as watermelon, strawberry, even the more exotic fruits such as passion fruit, which I love.  Test perfumes on your pulse points, and allow the scent to warm up and evolve on your body.  Give it a few minutes, and remember what fragrance went where.  A fragrance can smell very different on two people due to their own personal skin type, diet, and body chemistry.

WHERE TO SPRAY
Simply saying pulse points can leave many people scratching their heads in confusion.  Pulse points are places where the blood vessels are  closest to the surface of the skin, creating heat and acting like little warmers to better diffuse scent.  Where, now, exactly??
  • on the wrists
  • nape of the neck (under and behind ears)
  • crook of arms
  • behind your knees
  • hallow of your throat
  • back of ankles
  • hair
I love spritzing my hair because hair is very porous and therefore absorbs easily.  It’s so lovely to turn your head and feel a bit of breeze with a faint sweet scent of your own perfume.  Leave the men in your scent.  It’s as easy (and as natural) as marking your territory.  Men are very responsive to scents although they lack the abilities to describe what exactly smells “nice”… at least they can appreciate it.

YOUR OWN SCENT BUBBLE
Should carry no further than an arm’s length away.  We should not be able to smell you coming, trust me on this, no matter how good you think you smell, a heady overpowering scent is not attractive.  Plus, there needs to be some incentive for coming closer, no?

CARING FOR PERFUME
Perfumes should lounge in a cool dry place away from direct sunlight.  It is precious… it has the ability to sway moods, to enlighten, to bring back memories, and bring joy to one’s life- don’t spoil it by letting it “go off”.  It does have a shelf life, so enjoy it everyday once opened.  It is an easy wearable luxury, allow yourself to be the queen or the princess… everyday!

ENJOY MIXING IT UP
Sometimes a stronger heady perfume can be perfectly balanced with a light perhaps citrusy fruitier scent.  Try and experiment for yourself.  My favorite daily perfume is a mix of ……..   ah….. you thought I would spill the beans, eh??  Well if I gave THAT up then my scent wouldn’t be signature to me anymore, would it?  So I shall enjoy my own signature scent bubble with my most cherished loved ones and leave you to create your own!

I Can Haz a DigiPerm

I KNEW I should have taken pictures, I mean, what kind of blogger am I?  I go to the salon, opt for an expensive new treatment (any treatment is expensive when you’ve got belly-button length hair) and forget my camera?? Sheeesh.  But, instead I will scour the web to find a pic that is pretty similar to what I went through and we shall have a laugh with that.


photo courtesy of balayageatnewlook

So there I was, rifling through J Pop magazines at all the beauties with them luscious curls and holding in place the pages of styles that I liked so the stylist there can have a better idea.. we decided on the medium size curlers similar to the ones in the picture because I wanted more “curls” and not so much “waves”.  Here is the breakdown…

1.  She lightly trimmed my hair (dry) for added layers so the curls can be more bouncy and easily seen.
2. Shampoo with something divine smelling.
3. Sat there with dripping wet hair as she sectioned, and began wrapping my hair in curlers…
  • Each curler needed a thick protective matting between that and my head (they heat up the curlers later)
  • Each curler had another padding between the clamp and my hair (after it was rolled) so there aren’t any funny clamp-curls at the end.
4. She used some sort of solution.. on each of the curlers.. it sort of smelled like bananas.
5. She then attached me to the machine.  Each curler had a groove to which the machine inserted into… enabling the machine to heat each curler individually to the same temperature.
6. After the heating, she applied another solution, waited about 15 more minutes and we were done.
7.  Shampoo, condition and the styling begins.


Styling a digiperm.
Blow dry hair so that it is almost dry. Use curl enhancing creams/gels/etc now.
Curls will appear like the “old fashioned curls” that wave from left to right.
Separate your hair into a few large sections (1, 2, or 4) and twirl around your fingers.
Either continue to blowdry while continuing to twirl  OR
Allow to airdry in place.
Once your hair is completely dry, loosen up the beautiful ringlets.
Here is a video that showcases the technique…
(it’s in Japanese but you get the picture)
It’s been 24 hours and I will update with pictures once I’ve shampood/ conditioned/ styled on my own!!!

Tuesday, April 12, 2011

FOTD- Electric Eel, Fun and Vibrant Look

I’ve decided to brave another FOTD.  This time, I wanted it fun, vibrant, and kinda funky.  I chose the blues and greens for the eyes, to make them really pop, I added a bit of gold.   Added some lengthy lush lashes to complete the look and make it appropriate for some nighttime drama!


For the Eyes:
  • Primed with UDPP- very thin even layer
  • MAC’s Electric Eel up to the crease
  • MAC’s Scheme and Contrast blended into outer corners and drag towards middle.
  • Blended out with MAC’s Humid.
  • Urban Decay’s Honey to inner corners.
  • MAC’s Vanilla to browbones.
  • Lined with K-Palette Real Lasting Liner in 01 Black
  • Rimmed eyes with Make Up For Ever’s Aqua Creamliner in 1 (black).
  • Apply MAC’s Humid under bottom lashes.
  • Curl Lashes.
  • Applied Cover Girl’s Lash Blast Volume to lashes.
  • Apply Falsies, Curl lashes again to blend in real and faux lashes.
oops i cut one lash shorter than the other! pretend you didn't notice!!

For the Face:
  • Estee Lauder Double Wear Makeup in Ivory Beige.
  • Make Up For Ever’s Super Matte Loose Powder.

For the Cheeks:
  • Smashbox’s Smashing Shimmer to highlight cheeks, forehead, bridge of nose.
  • Clinique’s Shimmering Tones Powder Golden Bronze to sculpt cheekbones, sides of forehead, and along both sides of jawline.
  • Rock & Republic’s Bedroom Pressed Blush on cheekbones.

For the Lips:
  • Lorac’s Misbehavin lipstick
  • Rock & Republic’s Luxe Lipgloss in Drama Queen.

Earrings were from Forever 21.

Curls were from working out with my hair in a bun.

Shirt is from Max Studio.

Thanks for reading!

FOTD Naked Palette-Nice and Natural Look

photo courtesy of amazon.com

What better way to jump off my first Face of the Day than with the infamous Urban Decay Naked Palette?  The gorgeously rich and beautifully pigmented colors seem to be a staple in every makeup lovers drawer.  Today, I wanted to do a simple nude everyday look that anyone can pull off.  It seems only proper to do something universal as my first FOTD, oui??


For the Eyes:
I used Urban Decay Primer Potion (depotted because I’m not very patient).  I like to scoop some out of the tiny pot with a palette knife- yes, the same one that artists use for mixing their paints, because that’s how I feel makeup to be… artistry. Spread the primer potion with a synthetic brush (not of natural animal hair) so that it forms a light but even layer.

Darkhorse applied with the brush that came with my palette from lashline to crease.
Sidecar and naked (both) to blend out any harsh lines.
Sin to highlight my browbones.

K-Palette Real Lasting Eyeliner 24 h in 01 black to line my upper lashline. Darkhorse and a bit of Mac Carbon to line my lower lashline.  I don’t curl my lashes nor put on mascara- I don’t see it making that much difference plus I think it’s too high maintenance and uncomfortable fooling around with my mascara all day.  Plus I noticed that when I do wear mascara the lashes curl too high and I look too “dolly” and things fly into my unprotected eyes a lot.

horrible blending job, but, it'll do.

For the Cheeks:  I used Smashbox smashing shimmer to highlight and Clinique shimmering tones powder in 01 golden bronze, as a bronzer to sculpt my cheekbones a bit. I do use the number 3 trick with my bronzer: side of forehead down the cheek and down the jawline (like an inverted 3) It makes the bronzer look a bit more natural as the sun would usually hit your face in these areas.

For the Face:  I used Nanoce BB moist cream.  It is a medium coverage BB cream that is just a tab bit too light for my skin (hence the bronzer) but has great coverage and still seems to look natural.  It feels amazing on and never causes my skin to react or break out.


For the Lips:  nothing.  Oh, a bit of Blistex DCT (daily conditioning treatment) because I’m addicted to the stuff.  That is my natural lipcolor.  I’ve had girlfriends tell me they wish they had this lipcolor naturally and I’ve had little kids come up to me and straight up ask me “why are your lips BLACK???” so there are ups and downs in life, people.


And then I felt my lips were too empty so I pulled out my NYX snow white and BLAM!


because I can! you would too if you had one THIS cute :) 

So, peoples, which look do you prefer?

The soft and demure everyday brown smoky eye coupled with a light lip or a Go Big or Go Home Red lippie??  I think I prefer the first look.  On another note, for all you Jersey Shore watchin peeps, I GTL’d today.  Seriously, I had purchased a 4 pack of tan for the wedding and only went once so I had to go and use up another 15 min session.  It is amazing how much darker you can look in 15 minutes!  I’m only a little scared of being completely addicted to it, so after this 4 pack is over, I’ve decided not to buy another.  I tan pretty easily with a little 15 spf sunscreen, so it’s not like I need to go to the tanning salon.  It’s just scary imagining all the damage you’re doing to your skin in that loud, crazy, futuristic, cancer box.  Eeek.  But in other news, I’m lovin my tan!

Revlon Colorstay Ultimate Liquid Lipstick- Top Tomato

image courtesy of soap.com

Yes, the packaging does impress.
It’s one of the big reasons I decided to look again while walking pass the makeup selection on my way to buy a Valentine’s Day card for the Hunny.  Ok, ok, so I took the long way around the store to the card selection, what beauty lover wouldn’t?!

visit4info.com

In all honesty, it was Jennifer Connolly’s picture that lured me in… those amazing red lips!  I own a few red lippies and was so flustered by her bold lips that I had to stop and take a look-see.  The colors did look amazing… so I picked up a couple.  They were buy one get one 50% off at 11.99 each.
LOL photo courtesy of kissmyblackass.org

I bought Jennifer Connolly’s Top Tomato-a rich true red with blueish-pink sparkly shimmers.  (Dontcha just Love her?!) The color compliments my medium olive skin pretty nicely however I did have a few problems with the formulation.  First off, there is a distinct plastic/chemical plant/paint primer smell that makes me wince as I pull the lipstick wand out of the tube.  This smell does go away however.

The formulation is very thin.  It applies almost like a Benefit Benetint where it’s almost watery in consistency.  Some say one coat is enough while others say layer one thin coat (think nail polish!!) and wait one minute to dry, then layer another coat for true pigmentation to be achieved.
It then sets to a super gooey, sticky, dry finish.  This can be remedied with a lip gloss, another lipstick or lip balm, in my case.  After applying my fave Blistex DCT my lips feel smooth and supple once again.

The color does last, but not the full 12 hours without fading.  It fades pretty evenly IMO, and can be re-applied for more power.

Bottom line:
You don’t need this.  I think I’ll be returning mine.  While I love the energetic pop of color and the amazing packaging, the lipstick itself feels very uncomfortable to wear on its own.  Lasting power is good not great, and I think there are better long lasting lipstick/glosses out there.