Monday, November 15, 2010

dirty secret.

dirty secret.

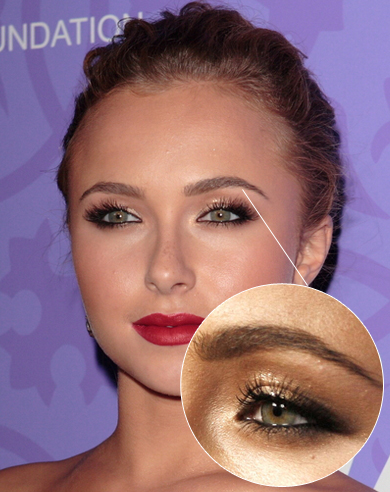
photo courtesy of taaz.com

photo courtesy of examiner.com

Yes, I have a dirty little secret.

If you’ve been keeping up, you’d know that I spent my day off last Friday by waiting in lines all day and sitting in traffic all night.  Not exactly life of the rich and fabulous.  But, I bit the bullet due to my earlier flirtations with the Rock & Republic brand.  I started with the amazing blush, went on to the sublime glosses, and recently discovered the sultry uber-blendable, kinda magical eye shadows.

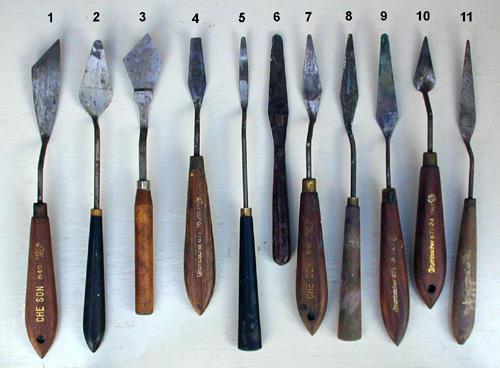
photo courtesy of exquisitejenn

I spent over $300.

That’s my dirty little secret.  One that I’m not proud of, and I hesitate to tell others because it will be the undrawn line in the sand- the breaking point where you know they’ll get the wide-eyed look-at-you-sideways kind of look and realize you’re addicted.

Anyway, based on the sale pricing at the sample sale, I would have spent a whopping $1305!!!!!  Does that make me feel just a tad bit better though?  Not really.  You see I am a makeup whore.  Yes, I’ve said it, I admit it and I’ll own up to it.  I simply have too much.  Now with the additional blushers eyeshadows, my drawer looks crammed full of silver and black! Do I regret it?  Maybe just a bit.  I really don’t need to be spending that much money on makeup after I recently blogged about being on a wallet lockdown.  I hate going against my word.

But now for the solution.

To fix this scenario, I am willing to do the following… no eating out for lunch for ONE MONTH.  Yup, I figure I’d burn an average of $10 a day for lunch (I eat out for lunch pretty regularly).  It will take one month to average out the price spent on the damned makeup.  Exception is cheapie grocery shopping where you buy cheap things (eggs, sandwich making material, instant noodle, salad making material, etc).  Another exception is on weekends where I will let my fiance choose anything and everything.  So, see y’all Dec. 13 where I would have saved enough to balance out my balance!!

I have to learn that as an adult, there is a price to be paid for things material.  You cannot just buy and buy simply because the cash is there… if you are going to throw your money to the skies for frivolous items, be prepared to pay for them in other ways! 
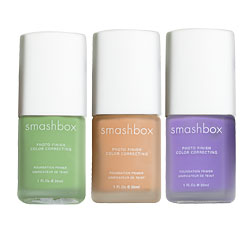
Earning yours is eons better than simply getting yours!
*** The packaging for this makeup line is super lux all the way!  However, I do have one minor complaint.  If you own as many blusher/eye shadows as I do, there should be a clear case (like MAC) so you can tell at a moment’s glance which is which.  Rather, I flip open each and every one to look for a fun look! :(   Not a lot of fun at all!  I was thinking about maybe swatching the colors and taping it to the bottoms (or go for ugly and tape ‘em to the top/front of the lids themselves!) … haven’t decided yet.

*** Am TOTALLY falling in love with everything tho! The colors are pigmented without being garish, soft and smooth to work with,  blendable beautiful shades.   I’m totally an eye girl but for some reason this season’s bright pink and deep red lips are beginning to make me smile….

Friday, November 5, 2010

BEST makeup sponge ever.

IMG_5967

I thought I did a post on this ages ago…

Guess I was wrong.

These are my #1 favorite sponges for makeup application.  I got mine from from Beauty.com at jaw-dropping (in a bad, not good way) 39.99.  I know, I know, a LOT to spend on these damn sponges.  But they bring me smiles and perfect foundation application so I feel the purchase is totally justified.  Plus one pink eggy lasts a very long time.  I don’t wear makeup everyday, and the first egg has lasted over a year with no signs of distress other than when Lucy accidentally played with it, thinking it was a toy (EVERYTHING is Lucy’s toy, dammit). 

The included foaming cleanser smells clean and seems to do a decent enough job getting rid of the dingy leftover/dried foundation… enough to turn the pink eggy a shocking hot pink again!  I also use a regular anti-bacterial foaming hand soap (bath and bodyworks) to make it squeaky clean, beautifully scented, and rid of all those nasty germs waiting to breed and infect my face.

I wash my pink eggy about once a week.  In the beginning you do notice a bit of pink coloring flushing through the water while rinsing your egg.  This is harmless and will stop over time.

IMG_5969

Usage:  Before using, repeatedly squeeze pink eggy under running water.  The pink eggy will then drink up the water and swell up to double its regular (dry) size.  Squeeze again to get rid of all excess water and proceed to use with makeup!  I usually squeeze a bit of foundation (pencil head) on the back of my left hand and use my right hand to work with.  The sharp pointy end of the egg is excellent for tight corners like around the nose and lips while the larger round end is great for bigger areas of the face including forehead and cheeks.  When using the pink eggy, press, don’t rub.  You want to let the skin absorb the foundation not slab it on like warpaint. 

It is definitely an investment piece, but once you learn to use and love it, you really wouldn’t want to be without it in your life.

Don’t believe me?  Read these other reviews

Monday, October 25, 2010

OPI: That’s Hot! Pink

PA210147

PA210149

PA210154PA210154

PA210154

PA210185

PA210190


The photos showed up a lot more red than hot pink but I still loved this fun vibrant color. 

Great For:

  • olive skin/tan beauties
  • summers… poolside
  • bring some “shockvalue” to a boring worksuit or monochrome outfit
  • great pick-me-up hue to brighten your day
  • you’ll wanna keep looking at your hands-believe me.

Base Coat: Seche Plus Fortified Nail Strengthener

Main Color: 2 thin layers of that’s hot! pink.

Top coat:  1 layer of Seche Vite

Optional: 1 layer (or just tips) OPI top coat- for extra chip resistance. 

Simply Superficial Tip:  Paint along the nail ridge and a bit underneath the nail to seal and really get chip-resistant.

Tuesday, October 12, 2010

NOTD: OPI Hearthrob


A really lovely soft peachy pink that goes great with a fabulous summer tan!


Isn't the name of this polish just too cute for words? :)


Such a pretty soft neutral color... perfect for the beach, a day at work, or date night!


Surely, one of my new faves!!


These shots were actually taken day 4 and, as you can see, NO CHIPPING whatsoever!
  • Started with one base coat of Seche Plus Fortified Nail Strengthener
  • 3 Thin Layers of OPI Hearthrob
  • 1 gooey semi-thick layer of Seche Vite (this stuff is miraculous! makes polish set and dry in about a minute!!!!)
  • 1 thin layer of OPI top coat
  • Wait a few minutes and fini!!
Simply Superficial TIP#1:  Although the Seche Vite works wonders in setting and drying the nail polish I find it chips relatively quick.  So, follow up with another layer of top coat and that will give your polish the true staying power!


Stay colorful! xoxo!

Friday, October 8, 2010

Neutrogena Deep Clean Cream Cleanser

Ever since I've stopped the pill about 6 months ago, I've noticed drastic changes occurring in my body.  You see, I've been on the pill for over 10 years and recently stopped because of a wive's tale I heard that later got squashed by my GYN as having absolutely No Validity.  That wive's tale?  If you plan on conceiving, it's best to quit the pill at least 1 year prior to "trying" to conceive.  This way, your baby will have fewer medical related problems.  The GYN informed me that this is simply not the case as the low-dosage birth control pill that I was on literally leaves my system in three days.  Which means that 3 weeks of "on" and 1 week of "off" medication leaves me with a clean system every single month.  That is great news.

Because the killer cramps I've lived in fear of since starting my period are back with a vengeance.  It's funny to me, to see horror movies where you scream in fear of something else-- a ghost, a monster, a killer, a rabid dog, whatever.... but imagine screaming in fear of your life as your body attacks itself.  That's what I've gone through and nothing, nobody, no doctors, no boyfriends, not even my own loving daddy- can help.  Has helped.  The only thing that gets me through is a half dose of vicadin or a codeine and a prayer.  Them Advils and Tylenols by now don't do diddly-squat.  I'll need to take at least 6 to 8 of 'em to even feel a difference!

Also, I've noticed a steady decline of my skin.  Now that I'm on the pill once more, I'm hoping that will also improve.  Because a bride cannot have ugly skin on her wedding day!  That is the biggest saddest red flag.  Luckily the bumps on my skin are small... I wouldn't even call them pimples, per se.  You'd have to get in awful close and look really hard to be able to see them at all, but the unevenness is obvious.  I can take my fingers and feel the skin on my face and literally not be able to feel smooth skin! Just a series of small and annoying bumps!

Thankfully, I've found something that seem to be helping.

photo courtesy of manekineko.us
Sure, the commercials are cheesy with actresses that obviously already have great skin, but I remembered trying this when I was younger and really liking it so I stopped into CVS with the huns and scooped one up.  I used it that night and felt so refreshed!  It doesn't really have a strong overpowering scent to the product.  It squeezes out of the tube creamy (not foamy) and smooths on over my face really nice, almost like a thick cream (probably, hence, the name).  I lightly circled my problem areas and rinsed off the cream.  Instantly it feels amazing!  Zing! Like a fresh breath of open sea air hitting your damp face in the light of the softly fading dusk.  I don't use lotion after using this product at night, simply putting a metronidazole gel 1% on my skin for rosacea. During the day I follow this facewash with Olay Sensitive SPF 25 and additional sunscreen.

During the night I felt a difference with the amount of oil secreted on my T-zone.  On days 2, 3, 4 it has continued to feel less and less oily!  It feels as though my skin is slowly coming around with the decrease of oil production.  It is reacting nicely, as today I've touched my skin multiple times and actually felt soft, smooth skin rather than bumpity-bump-bumps!  My skin is noticeably smoother and with fewer bumps.  During the day I feel less shine and almost no need for mid-day touch ups on my skin!  I love it!

Watch Hayden's Neutrogena commercial!

Wednesday, October 6, 2010

Lipstick Smash

photo courtesy of amlp311.blogspot.com
You all know what lipstick do for women.  It can change our mood, ourselves, the meaning of life!  Well, maybe not the last part, but it does give us a great opportunity to showcase our puckers. Now that you've understood the importance of color and of cool/warm hues, pick out a few shades for yourself!  Example:  an olive medium toned Hispanic woman may look better in an orangey red or even a burgundy lipstick while a really pale peaches and cream allergic to sunshine type of gal will do well to choose a blue red lipstick.  Sales Associates at any makeup counter will be happy to help you determine which shades go better with your skintone, but beware, (or go with a girlfriend to play it safe) as they may be only focused on making a sale!


Wearing Lipstick
  • Begin with clean lightly moisturized lips. (I'm a fanatic of lip balm)
  • If you have feathering or flaking of skin, slough off dead skin with a mixture of olive oil and sugar!
  • Line lips with a nude/natural tone lip pencil. (In school we learn to line from outer corner to inner corner or cupid's bow)
  • If your lips naturally are darker or have a lot of color, either use foundation or a product such as Laura Gellar's Lip Spackle to stiple the beigey color over your lips before using lip color.


photo courtesy of forum.hawaaworld.com


  •  Choose a shade or two of lipstick and fill in lips either straight from the tube or with a lip brush for more precision.
  • If you wish to blend two (or more colors) or even mix and match a lipstick with a gloss you can do so on your lips or on your palette using a palette knife.
    • Scrape off lipstick color thinly from the back of the lipstick
    • Add another lipstick color, a tint, gloss, whatever you want to the palette.
    • Using the knife, scrape and blend all colors together to achieve the right shade/consistency.
    • Now you have a unique color that's all YOU!
  • Add a dash of high shine gloss in the middle of your lower lip pout for fuller looking lips.


Simply Superficial TIP #1:  Set with a tissue by blotting and reapplying.  Then lightly brush translucent powder through the tissue for ultimate staying power.

Simply Superficial TIP #2:  Stick one index finger into your mouth and close your mouth as your pull your finger out. Sounds kinda kinky but the remnants of lipstick that WOULD have gotten all over your pearly whites are now on your fingers... wipe off.


Simply Superficial TIP #3: If you believe your lips are too plump (no such thing!!) or too thin... play with the lip liner, line slightly outside the edge for a thin lip and slightly inside the lip line for a fuller lip.

Simply Superficial TIP #4:  If you want the focus to be on your lips (say, red sassy lipstick) go easy on the eye makeup and blush!  There's nothing like overkill to take your from looking fierce to looking like a straight up clown.

Simply Superficial TIP #5: To make yellow teeth appear more white, use colors with blue-ish undertones, asking sales associates for help can make this easy for anyone.

Simply Superficial TIP #6: If you're in a tight jam, lipstick can sub for a blush!


I will be adding tips occasionally so I hope you had fun reading...


Keep Color'in!  xoxox.

Saturday, October 2, 2010

Perfecting Eyebrows


Eyebrows do a lot.  They are the arches that "frame your face" and the windows to your soul (eyes).  If they are groomed correctly, you appear neat, fresh, and clean.  If they are growing in a wildjungle, all haphazard and sticking out in every which direction, there's no help for you.  Just kidding.  All you need are the right tools and a good idea of the proportions of the eyebrow in connection to your eyes.

Now this picture says it all.  Study it carefully and you can begin to see the eyebrow of your dreams coming through.
Photo Courtesy of Lovingmore.info


If the above diagram is still unclear, I can summarize it for you.  It might help to buy a cheap white eye liner and follow along, marking the important areas of interest, so that you can have a better image when we're done.

Image courtesy of cnwyt.net


  • The eyebrow should start lined up from the corner of the nose.Take a pencil or ruler and line it upwards from the nose.
  • The Arch should match up to the edge of the iris (or, your eyeball).
  • The end of the eyebrow should be slightly past the eye.  Line up from corner of nose to the very outer edge of the eye and that point is the ending.
With those 3 measurements you should have the bulk of the eyebrow set in place.  The thickness of the brow and the angle of the arch really depends on your facial structure and your personal style.  Here are some beauties for your inspiration... please note the proportions of the brows and the face on the celebrity.

Image Courtesy of ayushveda.com
Image courtesy of shopriddle.wordpress.com
Image courtesy of hrhairstyles.com


I would recommend looking through magazines for brow-spiration and even investing in an eyebrow waxing/threading/tweezing done by a professional.  Then, as your eyebrow grows back slowly, you can attack the growths while maintaining the general shape.  As an esthetician, I would advise you to try threading first, and see if there are any ingrown hairs or strange bumps.  Waxing, though providing a clean result, can lead to wrinkles and saggy skin because it pulls at the skin pretty harshly upon removal.  Every skin care professional I've spoken with always recommend tweezing/threading over waxing.... it's just better for you in the long run. Tweezerman makes an AWESOME tweezer!

If you'd prefer cheating, there are also stencils now that you can place over your own brow and color, then remove the stencil and tweeze the outliers.  The only problem with this method is that they're not necessarily proportioned to YOUR OWN FACE, so you take on a bit of risk...


Image courtesy of black.women.beauty.central.com

I will also do a video on proportions and trimming. 

Making up Brows.

There are all kinds of makeup out there to help you with your brows.  Whether your brows are overtweaked or bushy jungles of mass chaos there's help.

Pencils: are around the longest and generally produce a harsher line than other methods.  Feather the strokes so that the color is distributed to look like real "hair". 

Eyeshadows: are my personal favorite, and when applied with an angled eyeliner brush in a lighter color than your brows, provides a beautiful natural finish.

Waxes: give a great long-lasting finish that looks natural.  Many times cosmetic companies will add a wax as a sticky base, adding powder later to set.

Mascaras: (clear) give a great setting power to whichever method you choose.  Use sparingly!

Image courtesy of esquire.com

Anastasia is a trusted brand in eyebrow grooming and makeup.  I would/have invested in her products and love em!  Play with it, and choose your own favorites.
Remember... practice makes perfect!!

Friday, October 1, 2010

Examples of the Color Wheel in Action

photo courtesy of marieclaire

This look above is gorgeous, dramatic, and not for the faint-of-heart.  See how the deep purples, maroons and blues (which are next to each other on the color wheel) blends seamlessly because the color families are so similar!

photo courtesy of marieclaire
Same goes for the Green, the Teal and the blue... they are next to each other on the color wheel and thus, can be blended seamlessly though vibrantly for that punch of flamingo color.


image courtesy of fashionmagazine-best.com
This is a beautiful eye-opening look involving colors that are quite opposite on the color wheel.  The yellow then orange and green are both tertiary colors.  This opposite color block, softened by a bit of orange in the middle creates a spark of attention where one color starts and the other color ends.  This type of look emphasizes the beauty of the eye makeup a bit differently than the previous two looks. 

Whether it's using one color family (colors next to each other on the color wheel) or using opposite colors (colors opposite each other on the color wheel) it's absolutely encouraged to play around.  Do use a boring dark matte brown with a fuscia hot pink highlight!  Do rock a smudgy purply blue for a night out!  Makeup is what you make it and learning the rules about how and why's will only help you Break IT BETTER!


Understanding Color


For our simple makeup purposes, we only need to understand the basics of the color wheel.

Primary colors: as we should remember from dipping our hands into messy pots of paints as kids, are the most basic colors from which all other colors are created: red, yellow, blue.

Secondary colors
: are derived from mixing the primary colors together: orange, green and purple.

Tertiary colors: are the colors you get from mixing the primary and the tertiary colors (next to each other) on the color wheel...

In looking at the outermost circle containing all colors, we can choose one color and go across the midpoint of the circle to the other side, where we can find it's color opposite and complementary color. For example, green and red, purple and yellow. These colors tell can often bring out other colors simply by being its striking opposite.. * think how awesome the color green looks on a redhead and you'll catch my drift...

Taking the information from these color wheels, we can learn about a variety of other clues including our *undertones and how to balance them, *what it means to be cool or warm hued, * what shadows look great together.

Now we can try to tackle these questions with the help of the color wheel.


Now you've all seen these strange color coded things whether they are in a tube, paste or powder form, our faces aren't lilac colored so what are these candy inspired creations for?? Well, you don't have lilac skin, but have you breakouts, ruddy skin, and dark under eye areas?

-Acne, breakouts and other blemishes are usually a shade of red... therefor the green concealor will work to cancel out the red to a neutral.

-Dark eye circles are usually a shade of blue or purple, choose the yellow tinged concealor to cancel out the violet undertone.

** Always match concealors to skintone not the color of discoloration.


Ever wonder if you were a cool tone vs. a warm tone person?? Simply strap on a siver and gold necklace and see which precious metal looks the best with your skin. Usually the silver tone indicate cool tone which means you look wonderful in
colors (both makeup and clothing)that exist on the right side of the color wheel. For the gold: warm tone lovelies you look best in warm tones or colors on the left side of the color wheel. For the red lipstick test: try wearing red lipstick in shades that flatter either the cool/warm undertone I guarantee you'll look awesome!!


Wearing eyeshadow can get pretty tricky given the myriad of colors available to us... using the color wheel as a hint, a general rule (that was made to be broken, as there ARE NO rules in makeup)can be created: colors next to each other on the color wheel fade nicely from one to the next. I like to place darker colors on the bottom and trick the eyes into seeing lighter and lighter as you go up. For example, choose a dark purple hue close to the lash line a mid purple or lilac as a mid color and blend upwards into a pale baby pink. so pretty!!

Until next time, have fun with makeup!

Makeup: getting started

What every good artist needs, a set of brushes, palette knife, and colors.  A good brush rinse and alcohol sprays are good for sanitizing... but this is for those of you whom want to learn makeup to practice on yourself, rather than make it a vocation... a makeup artist by trade spends a ton of time sanitizing btw... safety's always first!

Brushes: implements for placement and blending of colors.  This is kind of a no-brainer.  Brushes differ with the fibers (hair) used whether it is animal hair or synthetic plastic bristles.
 photo courtesy of buycheapmakeupandtips

Generally, if you're buying a powder, blush, eyebrow, eyeshadow, angled eyeliners etc... it is good to go with a decent quality animal hair brush.  When using flat foundation brushes or even fine eyeliner brushes, synthetic may be a better choice.  The reason is that the synthetic bristles impede bacteria growth so while using things that are more "wet" or have more slip, such as liquid foundation and liquid eye liner, it is better to go with using a synthetic, or else get used to washing brushes everyday!

Palette Knife:  is an actual knife that scrapes off color.
photo courtesy of ffcrafts

I'm showing a picture of the many types of artists' palette knifes however, you only need one.  What is this good for?  My favorite palette knife has lasted me years and enables me to blend all sorts of lipcolors together as well as stick foundations to suit a perfect shade.   You use the sharp end to scrape or cut off some makeup and the flat edge to mix and mash the colors until you have one unique color that's especially YOU!

Colors: Are the most fun part of all!  A plethora of eyeshadows, bases, foundations, powders, eyeliners, lipsticks ... what is makeup if not a wide array of colors with what we use to color our lives?


photo courtesy of alceevents

You thought diamonds are a girls' best friend? I'm here to tell you that the real best friend is color!  They have the ability to brighten, to widen, to POP!, to encourage, to motivate, and to brave the world... nothing is as fierce as a woman who entrances the world with a bright red lipstick!

Armed with these tools we are ready to move full throttle forward!

Does the world really need yet another beauty blogger?

An Asian one, at that??

Photo courtesy of Bamboonation


The answer, hopefully, is YES. 


You see I'm not just another Asian girl that loves all things Juicy and princessy, the color pink or its derivatives, loves playing with makeup and looks 18. 

I'm 32.

That's sort of mature, no?  I am definitely old enough to appreciate beauty, despite seeing the changes that come with age.  I am also a licensed Esthetician and a have Make-Up Artist certification from a respected makeup school, M.U.D (Makeup Designory, Burbank, CA).  While it is true that I've only held a few makeup related odd jobs throughout the years, the love of enhancement never quite leaves my soul.  

I am here to share with you my knowledge (by the books) as well as what I've picked up on "the streets" of life.  I will hopefully be doing almost a school of sorts, that tackles everything from skincare to lipstick.  I will add quick "how to-s" and maybe even some tutorials, depending on where this blog takes me...

While beauty is definitely more than skin deep, it is the means for us to enhance our favorite features so that when we are out in the world we can present the best version of ourselves possible.  Simply Superficial is born of the mentality that makeup should be: accessible, easy, adaptable, fun, and expressive.  Just like the how the latest fashion isn't necessarily suited to all shapes and sizes, we can pick and choose from the latest to select the looks we believe best fit our face, skin, coloring, and personality!

Have fun with colors everyone!!!